Blog
Agarose Gel Electrophoresis Short Notes
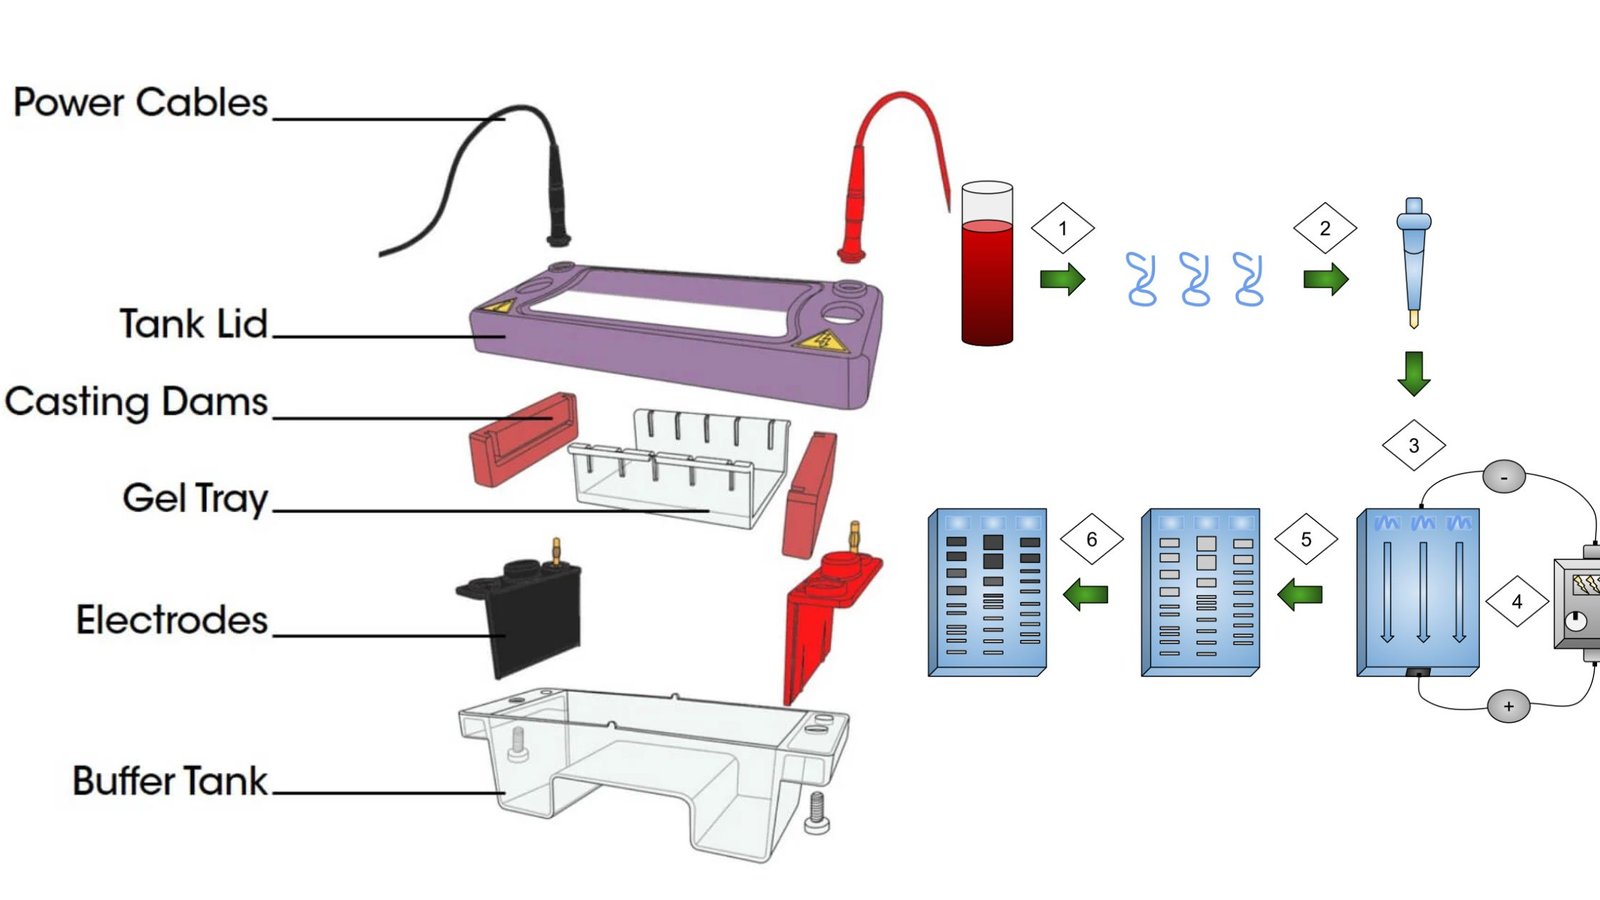
In this article we will discuss about Principle of Agarose Gel Electrophoresis, Steps Involved in Agarose Gel Electrophoresis and Applications of Agarose Gel Electrophoresis
Agarose gel electrophoresis is a simple and highly effective method for separating, identifying and purifying DNA fragments. Separation is carried out under an electric field applied to gel matrix. Because of the negatively charged phosphates along the backbone, DNA molecules migrate towards the anode.
Agarose is a natural linear polymer extracted from seaweed that forms a gel matrix by hydrogen-bonding when heated in a buffer and allowed to cool. They are the most popular medium for the separation of moderate and large-sized nucleic acids and have a wide range of separation.
Principle of Agarose Gel Electrophoresis
Agarose, a copolymer of D-galactose and 3, 6 anhydro L-galactose, forms a gel by hydrogen bonding. Concentration of agarose determines its pore size. The resolution of larger fragments of DNA are better with low concentrations of agarose, whereas it reduces the resolution of smaller fragments.
Agarose gel electrophoresis is conducted in a horizontal configuration because it provides better support especially at low agarose concentration and the bands of DNA are less distorted and the gel should be completely submerged in the electrophoresis buffer.
Requirements of Agarose Gel Electrophoresis
The equipment and supplies necessary for conducting agarose gel electrophoresis are relatively simple and include:
- An electrophoresis chamber and power supply
- Gel casting trays, which are available in a variety of sizes and composed of UVtransparent plastic. The open ends of the trays are closed with tape while the gel is being cast, then removed prior to electrophoresis.
- Sample combs, around which molten medium is poured to form sample wells in the gel.
- Electrophoresis buffer, usually Tris-acetate-EDTA (TAE) or Tris-borate-EDTA (TBE).
- Loading buffer, which contains something dense (e.g. glycerol) to allow the sample to “fall” into the sample wells, and one or two tracking dyes, which migrate in the gel and allow visual monitoring or how far the electrophoresis has proceeded.
- Staining: DNA molecules are easily visualized under an ultraviolet lamp when electrphoresed in the presence of the extrinsic fluor ethidium bromide. Alternatively, nucleic acids can be stained after electrophoretic separation by soaking the gel in a solution of ethidium bromide. When intercalated into doublestranded DNA, fluorescence of this molecule increases greatly. It is also possible to detect DNA with the extrinsic fluor 1-anilino 8-naphthalene sulphonate.
- Transilluminator (an ultraviolet light box), which is used to visualize stained DNA in gels.
Steps Involved in Agarose Gel Electrophoresis
Step #1 Prepare sample
Isolate the DNA and prepare the solution by adding blue dye so that it will be easy to observe the movement of the sample taking place in the gel.
Step #2 Prepare an agarose TAE gel solution
TAE buffer solution helps to generate an electric field during the process of electrophoresis. To prepare the solution, for example, if there is a requirement of 1% agarose gel then add 100mL TAE to 1 g of agarose. The higher percentage of agarose will give a denser screen. Dissolve the agarose by heating the agarose TAE solution.
Step #3 Gel casting
Pour the agarose TAE solution in a casting tray. Allow it to cool and solidify. A gel slab along with the wells is ready to use for the experiment.
Step #4 How to set up the electrophoresis chamber?
Fill a chamber with TAE buffer. Place the solid gel in the chamber. Place the gel in such a position such that it is near the negative electrode.
Step #5 Gel loading
Load the wells with the DNA sample and DNA ladder (a reference for sizes).
Step #6 Process of electrophoresis
Connect the positive and negative points to the power supply and chamber. Switch on the power and migration in the DNA sample due to the electric field generated. The negatively charged sample will move towards the positive point and away from the negative electrode.
Step #7 Observe the DNA
Once you see the migration of the blue colored DNA samples in the gel switch off the power supply. Remove the gel and place it in the ethidium bromide solution.
Step #8 Exposed Under UV light
Expose the ethidium bromide stained gel under UV light and take a picture. DNA bands appear in the lane of respective well. Also, the DNA ladder is visible. Therefore the length of DNA bands can be determined. Below is the image of the experiment conducted.
Applications of Agarose Gel Electrophoresis
Agarose gel electrophoresis is a routinely used method for separating proteins, DNA or RNA.
- Estimation of the size of DNA molecules
- Analysis of PCR products, e.g. in molecular genetic diagnosis or genetic fingerprinting
- Separation of restricted genomic DNA prior to Southern analysis, or of RNA prior to Northern analysis.
- The agarose gel electrophoresis is widely employed to estimate the size of DNA fragments after digesting with restriction enzymes, e.g. in restriction mapping of cloned DNA.
- Agarose gel electrophoresis is commonly used to resolve circular DNA with different supercoiling topology, and to resolve fragments that differ due to DNA synthesis.
- In addition to providing an excellent medium for fragment size analyses, agarose gels allow purification of DNA fragments. Since purification of DNA fragments size separated in an agarose gel is necessary for a number molecular techniques such as cloning, it is vital to be able to purify fragments of interest from the gel.

 Blog8 months ago
[PPT] Human Reproduction Class 12 Notes
- Blog8 months ago
Contribution of Indian Phycologists (4 Famous Algologist)
- Blog8 months ago
PG TRB Botany Study Material PDF Free Download

 Blog8 months ago
Cell The Unit of Life Complete Notes | Class 11 & NEET Free Notes

 Blog8 months ago
[PPT] The living world Class 11 Notes

 Blog8 months ago
Plasma Membrane Structure and Functions | Free Biology Notes

 Blog8 months ago
Julus General Characteristics | Free Biology Notes

 Blog8 months ago
Classification of Algae By Fritsch (11 Classes of Algae)


